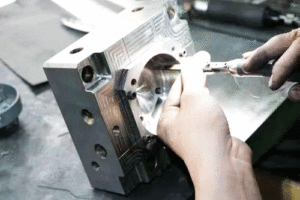
Injection Molding Process Optimization

The followings are 9 Questions about the Injection Molding Process Optimization.

1. The working state of the check valve during plasticization, injection and pressure holding.

  • Plasticization: On
  • Injection: close
  • Holding pressure: off

2. The relationship between injection speed and injection pressure.

The relationship between injection pressure and injection speed is as follows:

In the injection molding process parameters, the speed rather than the pressure is dominant.

There is no direct relationship between these two. In production, for example, with the setting of injection speed at 100mm/s, when the actual injection pressure is less than the set pressure value, the screw is molded at an injection speed of 100mm/s. When the actual injection pressure exceeds the set pressure value, the screw will not reach the speed of 100mm/s.

Therefore, the faster the injection speed, the greater the actual pressure value. And the higher the injection speed, the higher the required set pressure.

Besides, a high set pressure is also required at very slow speeds. That is to say, the point with the lowest injection pressure will not be at the fastest injection speed, nor the slowest speed.

3. How to solve the problem of focal spots on the product?

(1) Clean the die surface.

(2) Find the position of focal spot and reduce the injection speed.

(3) Reduce the mold temperature.

(4) Reduce the clamping force.

(5) Reduce the material temperature.

(6) Die surface sticker (increase mold exhaust, generally not recommended).

4. The influence of mold temperature on product deformation

In terms of molds, the factors affecting the deformation of plastic parts mainly include gating system, cooling system and ejection system.

For the mold temperature control, the temperature difference between the following points should be determined according to the structural characteristics of product:

  • The movable mold and the fixed mold
  • The mold core and the mold wall
  • The mold wall and the insert

Therefore, the difference in the cooling shrinkage speed of each part of the product is controlled. Then, the product tends to bend in the direction of traction on the side with higher temperature after demoulding, to offset the difference in orientation shrinkage.

What’s more, it can avoid the deformation of the product according to the orientation law. For products with exactly the same shape, the mold temperature should be kept consistent accordingly. So that the cooling of each part of the product can be balanced.

5. Why is a product not completely filled and has flash?

(1) The mold problem.

(2) The mold exhaust is not good.

(3) The clamping force of the machine is insufficient.

(4) There are foreign objects on the die surface.

Injection Molding Process Optimization

6.Why is the suction process after plasticization necessary?

Whether the back suction is large or small will directly affect the product quality. If it is large, it is easy to cause silver threads on the product surface. And if it is small, the product may easily get the following problems:

  • unstable residual quantity
  • unstable product quality
  • overflow of the mold runner
  • threading of the nozzle,etc..

The general experience value should not be less than 5mm.

How to optimize?

According to the experience value, fine-tune the problems of the product in the actual production, until the qualified product is produced.

7. What effect does the back pressure have on the product? How to set the back pressure?

High back pressure

(1) If the pressure at the front end of the barrel for the melt is too high, the material temperature will be high. Then, the viscosity will decrease, making it easy to fill. But it will increase the flash of the product outline.

(2) The storage time is long, and also the heating time of the melt in the barrel. It will result in thermal decomposition and the poor color difference on the product surface.

(3) The screw retreats slowly, resulting in a long storage time. Then, the molding cycle will be long, which affects the production efficiency.

(4) The high melt pressure makes the mold of the cold runner (not affected by the needle valve) prone to drooling. That will cause the lower mold injected. And it will further cause the cold material in the runner to block the glue inlet or cold material spots on the product surface.

(5) The mechanical wear of the screw and barrel is large, which affects the service life, etc.

Low back pressure

(1) The screw recedes quickly. Then, the melt density flowing into the front end of the barrel is small with the trapped air. And that will cause silver streak on the product surface.

(2) It may cause poor plasticization, unstable material quantity, large changes in product weight and size.

(3) The product surface shrinks, along with other undesirable phenomena like cold grains and uneven gloss.

(4) Bubbles are prone to appear inside the product.

(5) It may also cause low melt temperature, high viscosity, poor melt fluidity, etc.

Setting of back pressure

The principle is from small to large. (For details, please refer to the value and the structural characteristics of the product given by the material supplier).

8. What to do if the remaining material is unstable?

(1) Check whether the three-piece screw set is in good condition.

(2) Check whether the injection pressure is stable. (Whether the inside of the nozzle is clean).

(3) If the nozzle has leakage phenomenon.

(4) Whether the temperature of the screw and the mold temperature machine are stable or not within the allowable deviation value.

(5) Whether the loosening value of the screw is set too small, resulting in cold material.

9. How to quickly find out a reasonable clamping force?

(1) Calculation method:

clamping force = projected area of all products (including runners) X pressure in mold cavity

(2) Practical method:

First set a clamping force and an empirical value (not too small) according to the size of the product and the tonnage of the machine. When the product has no burrs, gradually reduce the clamping force until the product has burrs. Take the pressure value of the last (without burr) edge with burrs.

Leave a Comment

Related Post

Contact Us