Polishing Treatment for Plastic Molds
Polishing Treatment for Plastic Molds With the widespread application of plastic products, such as daily-use items and beverage packaging containers, there is often a requirement
With the widespread application of plastic products, such as daily-use items and beverage packaging containers, there is often a requirement for the surface of plastic mold cavities to achieve a mirror-like polish. For molds used in the production of optical lenses, laser discs, and other precision components, the demand for surface smoothness is exceptionally high, necessitating stringent polishing requirements.
Polishing not only enhances the aesthetics of the workpiece but also improves the corrosion resistance and wear resistance of the material surface. Additionally, it can impart other advantages to molds, such as facilitating easy demolding of plastic products and reducing the production injection molding cycle. Therefore, polishing is a crucial step in the process of plastic mold fabrication.
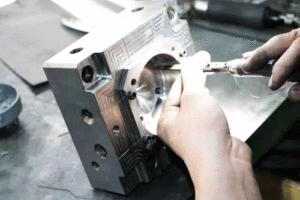
Mechanical polishing is a method of polishing that involves cutting and removing protrusions on the material surface through plastic deformation to obtain a smooth surface. It generally utilizes tools like oil stones, felt wheels, sandpaper, etc., with a focus on manual operation. For special parts such as rotating surfaces, auxiliary tools like turntables can be used. The ultra-precision grinding and polishing method can be employed for high-surface-quality requirements.
Ultra-precision grinding and polishing use specially designed abrasives pressed tightly against the workpiece surface, which is immersed in a polishing fluid containing abrasives. The abrasive undergoes high-speed rotational motion. This technique can achieve a surface roughness of Ra 0.008μm, making it the highest among various polishing methods. It is commonly used for optical lens mold polishing.
Chemical polishing involves preferential dissolution of microscopically raised areas on the material surface in a chemical medium, resulting in a smooth surface. The main advantages of this method include the absence of complex equipment, the ability to polish intricate shapes, simultaneous polishing of multiple workpieces, and high efficiency. The key issue in chemical polishing is the preparation of the polishing solution. The surface roughness obtained through chemical polishing is generally in the range of several tens of micrometers.
Electrolytic polishing shares the basic principle with chemical polishing, selectively dissolving microscopically raised areas on the material surface to achieve a smooth finish. Compared to chemical polishing, electrolytic polishing can eliminate the influence of cathodic reactions, yielding better results. The electrochemical polishing process consists of two steps:
(1) Macro-level leveling, where dissolution products diffuse into the electrolyte, reducing the geometric roughness of the material surface, Ra > 1μm.
(2) Micro-smoothing, where anodic polarization enhances surface brightness, resulting in Ra < 1μm.

The workpiece is immersed in a suspension of abrasives and placed in an ultrasonic field. Utilizing the oscillation effect of ultrasonic waves, the abrasives grind and polish the surface of the workpiece. Ultrasonic processing exerts minimal macroscopic force, preventing deformation of the workpiece, but the fabrication and installation of fixtures are challenging.
Ultrasonic processing can be combined with chemical or electrochemical methods. After solution corrosion or electrolysis, ultrasonic vibration is applied to stir the solution, causing the dissolution products on the workpiece surface to detach. The uniform corrosion or electrolysis near the surface is promoted. The cavitation effect of ultrasonic waves in the liquid can also inhibit the corrosion process, facilitating surface brightness.
Fluid polishing is a process that achieves polishing by the high-speed flow of liquid and the abrasive particles it carries, flushing the surface of the workpiece.
Common methods include abrasive jet machining, liquid jet machining, and fluid dynamic grinding. Fluid dynamic grinding is driven by hydraulic pressure, causing a liquid medium carrying abrasive particles to flow rapidly back and forth over the surface of the workpiece. The medium typically consists of a special compound (polymeric material) with good flowability at lower pressures, mixed with abrasive particles, often silicon carbide powder.
Magnetic grinding and polishing utilize magnetic abrasives to form abrasive brushes under the influence of a magnetic field, allowing for the grinding and processing of workpieces. This method offers high processing efficiency, good quality, easy control of processing conditions, and favorable working conditions. With suitable abrasives, surface roughness can reach Ra0.1μm.
The term “polishing” in plastic mold processing differs significantly from the surface polishing required in other industries. Strictly speaking, mold polishing should be referred to as mirror finishing. It not only demands high requirements for polishing itself but also imposes strict standards on surface flatness, smoothness, and geometric precision. Surface polishing generally only requires achieving a shiny surface.
Mirror finishing standards are divided into four levels: AO=Ra0.008μm, A1=Ra0.016μm, A3=Ra0.032μm, A4=Ra0.063μm. Since methods like electrolytic polishing and fluid polishing are challenging to precisely control the geometric accuracy of parts, and the surface quality of methods like chemical polishing, ultrasonic polishing, magnetic grinding and polishing cannot meet the requirements, precision mold mirror finishing primarily relies on mechanical polishing.
To achieve a high-quality polishing effect, it is crucial to have high-quality polishing tools and accessories such as oil stones, sandpaper, and diamond polishing paste. The selection of the polishing procedure depends on the surface condition after the initial processing, such as machining, electrical discharge machining, grinding, and so on. The general process of mechanical polishing is as follows:
The surface after processes like milling, electrical discharge machining, or grinding can be polished using a rotary surface polishing machine or an ultrasonic grinding machine with a speed of 35,000 to 40,000 rpm. Common methods include using wheels with a diameter of Φ3mm and WA #400 to remove the white electrical discharge layer. Then, manual oil stone grinding is performed, using strip-shaped oil stones with kerosene as a lubricant or coolant. The typical sequence is #180 ~ #240 ~ #320 ~ #400 ~ #600 ~ #800 ~ #1000. Many mold manufacturers choose to start from #400 to save time.
Semi-precision polishing mainly uses sandpaper and kerosene. The grit sizes of sandpaper are as follows: #400 ~ #600 ~ #800 ~ #1000 ~ #1200 ~ #1500. In practice, #1500 sandpaper is only suitable for quenched mold steel (52HRC and above) and is not suitable for pre-hardened steel, as it may cause surface burning on pre-hardened steel components.
Fine polishing primarily utilizes diamond polishing paste. If polishing is done using a polishing cloth wheel mixed with diamond polishing powder or paste, the usual polishing sequence is 9μm (#1800) ~ 6μm (#3000) ~ 3μm (#8000). The 9μm diamond polishing paste and polishing cloth wheel can be used to remove the hairline scratches left by #1200 and #1500 sandpaper. Subsequently, polishing is done with felt and diamond polishing paste, in the sequence of 1μm (#14000) ~ 1/2μm (#60000) ~ 1/4μm (#100000).
Polishing processes requiring precision above 1μm (including 1μm) can be carried out in a clean polishing room in the mold processing workshop. For more precise polishing, an absolutely clean space is necessary. Dust, smoke, dandruff, and saliva droplets could potentially render the highly precise polished surface obtained after several hours of work unusable.

3.1 When using sandpaper for polishing, it is essential to use soft wooden or bamboo sticks. Softwood sticks are better suited for polishing curved surfaces or spherical shapes, as they can better adapt to the curvature of round and spherical surfaces. Harder wooden sticks, such as cherry wood, are more suitable for polishing flat surfaces. Trim the end of the wooden stick to match the shape of the steel surface, preventing the sharp corners of the stick (or bamboo stick) from causing deeper scratches on the steel surface.
3.2 When switching to different grits of sandpaper, change the polishing direction by 45° to 90°. This helps distinguish the streaks left by the previous grit. Before changing to a different grit of sandpaper, carefully wipe the polished surface with a clean cloth soaked in a cleaning solution like 100% pure cotton with alcohol. Cleaning is crucial as even a small grain of sand left on the surface can ruin the subsequent polishing work.
The same cleaning process is equally important when transitioning from sandpaper polishing to diamond polishing paste. Before continuing with polishing, all particles and oil must be thoroughly cleaned.
3.3 To avoid scratching and burning the workpiece surface, extra care must be taken when polishing with #1200 and #1500 sandpaper. It is necessary to apply a light load and use a two-step polishing method for these grits. When polishing with each grit, perform two polishing passes in two different directions, rotating between the two directions each time by 45° to 90°.
4.1 Diamond polishing should be carried out with minimal pressure, especially when polishing pre-hardened steel or using fine grinding paste. When polishing with #8000 grinding paste, a common load is 100-200g/cm2, but maintaining the accuracy of this load is challenging.
To make this easier, a thin and narrow handle can be created on a wooden stick, such as by adding a copper piece. Alternatively, a portion can be cut off a bamboo stick to make it more flexible. This can help control the polishing pressure to ensure that the surface pressure on the mold is not too high.
4.2 When using diamond grinding and polishing, not only should the working surface be kept clean, but the hands of the worker must also be carefully cleaned.
4.3 Polishing time should not be overly long; the shorter the time, the better the effect. Prolonged polishing may result in “orange peel” and “pitting.”
4.4 To achieve high-quality polishing, polishing methods and tools prone to heating should be avoided. For example, polishing wheel polishing can easily generate heat, leading to the formation of “orange peel.”
4.5 When the polishing process stops, ensuring the cleanliness of the workpiece surface and thorough removal of all abrasives and lubricants is crucial. Subsequently, a layer of mold rust inhibitor should be sprayed on the surface.
Since mechanical polishing is primarily done manually, polishing technology remains a significant factor affecting the quality of polishing. Additionally, it is related to mold materials, the condition of the surface before polishing, heat treatment processes, etc. Quality steel is a prerequisite for achieving good polishing quality. Non-uniform surface hardness or differences in characteristics of steel often lead to polishing difficulties. Various inclusions and pores in steel are not conducive to polishing.
Increasing hardness increases the difficulty of grinding but reduces the surface roughness after polishing. Higher hardness requires a corresponding increase in polishing time to achieve lower roughness. Simultaneously, with increased hardness, the likelihood of over-polishing decreases.
During the fracturing process of steel in cutting and mechanical machining, the surface layer may be damaged due to heat, internal stress, or other factors. Improper cutting parameters can affect the polishing effect. Surfaces after electrical discharge machining are more challenging to grind compared to surfaces after regular machining or heat treatment. Therefore, precision electrical discharge machining should be employed before the end of electrical discharge machining. Otherwise, a hardening layer may form on the surface.
If the precision of electrical discharge machining is chosen incorrectly, the depth of the heat-affected layer can reach up to 0.4mm. The hardness of the hardened layer is higher than that of the base material and must be removed. Therefore, it is advisable to add a rough grinding process to completely eliminate the damaged surface layer, forming an evenly rough metal surface as a good foundation for polishing processes.

Polishing Treatment for Plastic Molds With the widespread application of plastic products, such as daily-use items and beverage packaging containers, there is often a requirement

Injection Molding Techniques for TPE and TPR Injection Molding Techniques for TPE and TPR 1. Dry the TPE and TPR material before injection molding It

Winter Maintenance Measures for Injection Molding Machines As winter approaches and temperatures gradually drop, a cold chill envelops the earth. While ensuring personal warmth, it

Assessment Regulations for Mold Trial Exceeding 3 Times Assessment Regulations for Mold Trial 1. Purpose The purpose of this regulation is to standardize the work of